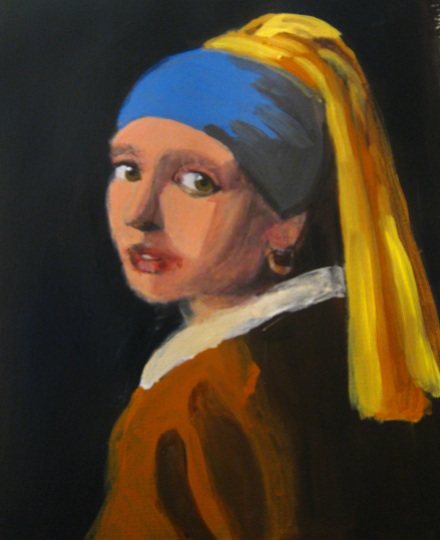
Last week I demonstrated how to start a master copy of the painting, Girl with a Pearl Earring, by Vermeer, ca. 1656. I demonstrated the initial stages of selecting a color copy reference of the painting, explained how to draw a grid, described a method of tracing by using a window and finished up with a demonstration on how to paint a three value painting including white, gray, and black paint. Today I will explain the process of transforming a three value painting to an initial color lay in painting.
Step One: Use Three Value Painting as a Guide to Identify Lights and Darks
Now that the painting has three values, white, gray and black I can use that as a guide to finding the lights and darks in the painting. I began the initial color lay in by trying to break down the main colors I see in the color reproduction of, Girl with a Pearl Earring. The seven main colors I noted in this painting were: Blue, Yellow, Yellow Ochre, White, Black, and a light flesh tone. I got the idea to do an initial color lay in from the book I mentioned last week, The Complete Oil Painter, by Brian Gorst. I laid out these basic colors from Liquitex Acrylic Paint brand on my palette: yellow ochre, titanium white, ultramarine blue, napthithol crimson, burnt sienna, ivory black, primary yellow. I added tomato red to my palette as a substitute for alizarin crimson. Using a palette knife, I began mixing up the colors I wanted using large amounts of paint to make nice large piles of paint, which I call a color string. I began the painting by starting with the darkest value which was a bluish black in the background of the painting. To create this dark value, I mixed ultramarine blue and ivory black.
After I had established the darkest value and painted in the background area or negative space, I started painting in the middle values such as the blue turban, the gold robe, the light yellow scarf, and the fairly light skin tone. For each color, I mixed up two values one was darker and the other was lighter. To make lighter values, I added small amounts of white to the pre-mixed initial local color. And to darken a color, I added ultramarine blue or burnt sienna. I reserved using black for the darkest colors. Periodically, I sprayed the canvas and the palette with water to keep the paints wet, so they wouldn’t dry out. I saved the lightest lights for last, such as the whites of the eye, the fur collar and the highlights in the eyes and mouth. To keep the edges between each value soft, I painted quickly, using two large brushes with light and dark values painted right next to each other and allowed them to “melt” into each other. This technique is called painting wet into wet, and keeps the painting from having harsh outlines. After I had painted out all the white areas, I began painting in the shadowed areas of the painting, including the face, the turban, the scarf, and the robe. Important: Remember to wash out your brushes in a water jar every time you switch colors and use a paper towel to dry off the paint brush so it won’t get too watery. Also, make sure that the paint doesn’t dry on your brushes and be sure to clean each brush thouroughly in water after you complete a painting session.
Step Two: Take a Break from Painting
This next step of taking a break, may seem counterintuitive, but I find it helps me to be more objective about a painting’s progress. After I completed the initial painting session, I took a break for several days to get a fresh take on it. When I returned to the painting, I wrote down a list of things I would like to change and I checked the facial proportions to be sure that the drawing was correct. In the next session, I corrected things like proportions, added shadows with a glazing technique, and tried to make more accurate color matches. To help obtain more accurate color mixtures, I researched Vermeer’s palette and painting techniques. And to create the glazed shadow areas in this painting, I used a Slow Dri blending medium by Liquitex in my darker paint mixtures to thin out the consistency of the paint.

