What is Artist’s Block?

Hello Friends, I am recycling an old blog post here, because it seems so relevant to the struggle I have had in getting this new series, Voices, and Visions off the ground. It has taken me several months to get traction, but I finally have some sketches to share! At last! The series is about the human condition, The World with waternarkLONGIN~1, with watermark 
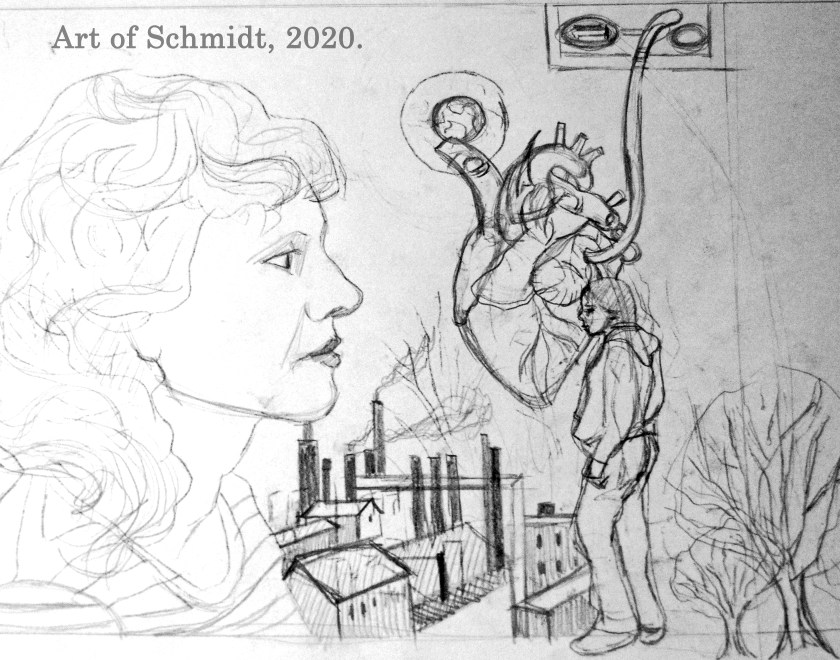
and is inspired by poems, by writers such as Williams Wordsworth, who wrote the poem, “The World is too much with us.” Though it was written several hundred years ago, in 1807,  about the conflicts between our connection to nature, and the pull of materialism driven by the industrial revolution in England during the 19th century, it still seems so relevant today. Anyways, on to the blog post, which is about the Artist’s Block.

What is Artist’s Block?

Art of Schmidt Blog Post


This year has been a difficult one with lots of transitions and changes. One of these big changes was my decision to drop out of the Human Services Associate’s degree program at Frederick Community College, after 18 months of double-mindedness between feeling like I had to finish it because I didn’t have any other solid plans for my career, and I had already put in countless hours writing papers, studying and completely fieldwork.  I had felt burnt out and unmotivated to finish the program, and I also felt split in half between my desire to be a professional artist and the need to carve out a definite career plan for myself. It was a difficult decision but I finally decided to drop out after some soul searching and talking with my academic advisor for a variety of reasons. In addition, the workload that this academic program demanded left very little time for creating art. And if I am 100 percent honest with myself, I have always wanted to take my art to the next level beyond just a hobby, but felt unsure of how to pursue this goal after I graduated from McDaniel College with a degree in Art in 2005, and it didn’t seem “practical” to pursue art as anything more than a hobby. I always felt somewhat unsure if Social Work was really the right path for me in contrast.


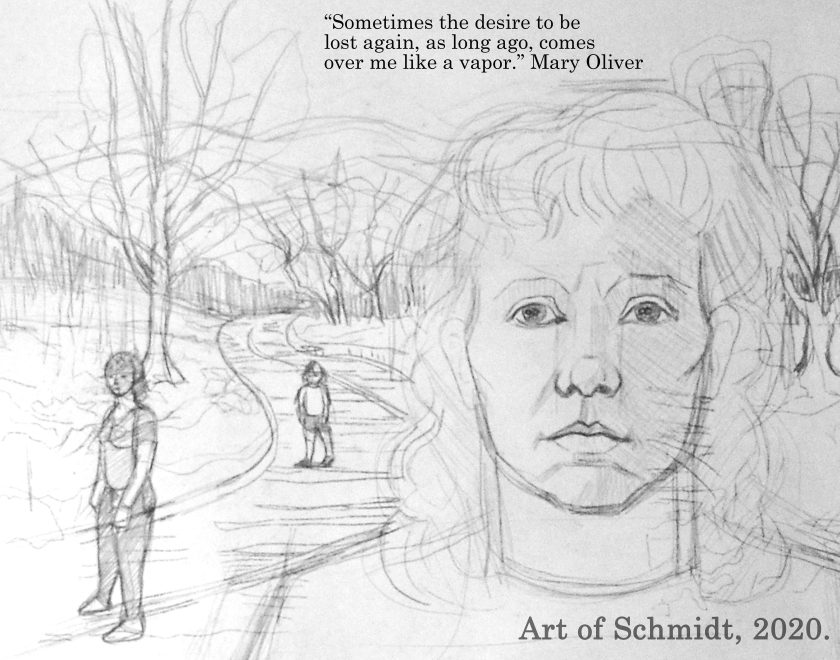
Lately, I have been learning that creative time is important to me and my well being. Creating artwork has been an outlet for me at various times in my life during stressful moments and personal struggles, especially during my father’s long illness and eventual death in 2011 from heart disease.  Making paintings and drawings in oil, watercolor, pastel, and pencil has provided me with a safe way to process difficult feelings and emotions. However, lately, making art has been very challenging and more like a test of endurance and skill than the oasis or refuge it used to be. In spite of the difficulties, I have been pressing on with sketches and paintings to prepare for my October art show at the Frederick Coffee Company as Artist of the month. However, the joy I once felt in making art seems to have deserted me.  I am making very slow progress with starting only 1-2 paintings a week, after looking at some reference photos I took of Catoctin State Park, here in Thurmont, MD.  What is going on here? How can I go from feeling like creating artwork is my lifeline, to it has become my enemy and tormentor and relentless critic?  After reading an article, entitled, “7 Types of Creative Block(And what to do About Them)”, by Mark McGuiness, I think I am beginning to understand that this lack of forwarding motion is the dreaded  Artist’s Block that seems to afflict creative types from a variety of field from musicians, writers, and artists.

Artists: How to Re-Surface Old Paintings, both oil and acrylic

A Response to Last Month’s Post: How to Re-Prime Used Canvases


This blog post is inspired by a blog post from last month, entitled: Artists: What Should You Do with Unfinished Artwork? dated August 12, 2018. In this post, I wrote about the artwork that had been abandoned for various reasons. I also added a list of various highlights from an article entitled, “50 Ways to Use Your Unfinished Art.” Several suggestions for completing your artwork were listed in the aforementioned article including taking pictures of your artwork to manipulate it, cutting up the artwork and re-assembling it, throwing the painting away, etc. However, one technique that I didn’t mention for completing art work is to start over from scratch. For example, this could mean re-surfacing an old canvas by using sandpaper or even a power sander, depending on how thick the paint has been applied to the canvas. The processes for re-finishing canvases are different, depending on whether acrylic or oil paint was used, which is a fact that I learned after reading two articles on The Painters Keys website- Re-priming Old Canvases, and How to Resurface an Old Painting by Ericka Lancaster. I really wish I had known this sooner, as I am not sure how my old paintings, which have been re-surfaced with sandpaper and acrylic gesso, will hold out over time.

Consequently, I plan to do more research in the future, before I am embarking on a similar project with older canvases. I want to be certain that I can create quality paintings which will pass the test of time. Ok, so now to what I learned from reading these articles. For example, in the Painter’s Key’s website, the author responded to a query from a reader about how to restore an old canvas, so that it could be re-painted. (Source: http://thepainterskeys.com/reprime, Robert Genn, date of access 08/24/18). In response, the author stated that to re-surface an old oil painting can create some concrete and creative challenges because if the re-surfacing process is not done correctly, it can cause the paint to flake off from the surface.  (Source: ibid) Therefore, because of this possibility, many artists choose instead to use new materials, i.e. new canvases or substrates.  (Source: ibid)

Here are some tips for re-purposing oil paintings from the article, Re-priming Used Canvases:

  • Sand the surface of your oil painting until it is completely dull in appearance. (Source: Ibid)
  • I used a power sander with 150-grade coarse sandpaper, because it is easier to use than individual strips of sandpaper, and it gets the job done much faster.
  • After you sand the painting, use a microfiber cloth to get rid of any excess paint chips. For heavily encrusted paint, you can give the canvas or paper another pass with the power sander.
  • When the canvas is completely clean and you can see the tooth of it, use an “oil or alkyd-based gesso or oil primer.” (Source: ibid) You can use a scumbled technique and a rag, to cover the offending areas you don’t like about your painting, and leave other areas, untouched that you like. Using this technique is a compromise between using the old surface and the paint which remains, and painting a new layer of paint. (Source: ibid)


  • As an alternative, you can use a mixture of titanium white oil paint and linseed oil. You may add additional colors to the mixture if you would like to add an underpainting; such as burnt sienna or yellow ochre. (Source: ibid) This step will provide you with a middle value, with which to compare your other values and help to create color harmony in your painting.


On the other hand, re-priming or painting over acrylic paintings is a  completely different scenario and process. For instance, “acrylic molecules remain sticky forever,” and you need to ensure that there is “no final varnish remaining.” Instead, acrylic paintings should be “cleaned outdoors with household ammonia and well flushed with water before applying a water-based gesso, thick or thin.” And unlike oil based surfaces, paintings with an acrylic paint can be re-surfaced with gesso as a priming agent. (Source: ibid)

Here are some steps you can follow to re-surface an old acrylic painting, according to the artist, Erica Lancaster:

  • Clean the old acrylic painting with a soft microfiber cloth until it is free of dust or grime.
  • Use sandpaper to remove the old acrylic paint with a light touch, while you concentrate on “heavily textured” sections of the canvas. If you can’t get rid of all the texture from the acrylic paint, don’t worry about it.
  • Go over your sanded acrylic painting with a clean cloth to remove any additional paint particles.
  • Paint your canvas with Gesso and use even coats. Remember to let each coat dry at a time before applying a new layer of gesso. This can take up to 24 hours to “cure.” If you want to thin out your gesso, you can add water to the mixture. Test your canvas and check to see that it is completely dry, before applying any acrylic paint. As a general rule, you want to have at least two dry coats of gesso on your painting before you begin adding acrylic paint.
  • Go over your canvas with sandpaper again. As to how many times you choose to sand the canvas that is completely up to you. Deciding on what amount of texture to give your paintings is a personal creative choice, and it depends on what type of “look” you want your painting to have, such as photorealism or abstraction. If you want a realistic look, you would want less texture and thin smooth layers of paint.
  • The final step before you begin painting is to wipe your canvas again with a clean microfiber cloth. Now your canvas is ready to begin painting upon. (Source: http://www.erikalancaster.com/art-blog/how-to-resurface-old-canvas-paintings-to-crete-new-artwork.com, “How to Resurface Old Canvas Paintings to Create New Artwork,” Erika Lancaster, date of access, 8/24/18.

So there you have it. Two different approaches to re-surfacing old paintings, depending on whether you have an acrylic or oil painting on your canvas.  This week’s artwork

water lily three value sketch_edited-1, flat
Three Value Sketch, water lily, graphite on paper, 5 x 7 inches, Jodie Schmidt, 2018.
Water Liliy redux, final
Adobe Photoshop Photo Collage, digital image, Adobe Photoshop Elements, 5 x 7 inches, Jodie Schmidt, 2018.
water lily watercolor, color study_edited, flat
Color Study for Water Lily, Mixed media, 6 x 7 inches, Jodie Schmidt, 2018.

features the creative process of my latest painting in progress, a water lily.  My next step is to combine all these sources I created to make a completed oil painting, which I hope to finish in the near future! Happy painting and thanks for stopping by!

Artists: What Should You Do with Unfinished Work?

It all started with a bad day

It was a tough day in the art studio today. I woke up this morning with very little energy; however, I was determined to make time for art regardless of my lethargic state. Several cups of coffee and a long walk around my neighborhood later, I was ready to begin. I set out to start a cat portrait I have wanted to work on for a while from one of my art technique books. I set my timer for 25 minutes and I started drawing from an art demonstration book. Suffice it to say, the drawing did not go well, at all, despite several attempts to get the proportions of the cat’s body correct. Each attempt just brought on more feelings of frustration. After the third attempt, I finally gave up and put my supplies away and went to do something else, probably laundry or reading a book. After working on the cat portrait, I realized that I am really out of practice when it comes to doing animal portraits, as I have been focusing a lot more on floral subjects, which is made up of simpler shapes and less precise in their proportions than animals and people. And I realized that I needed to practice drawing much more often like I did last summer when I completed a drawing challenge, 100 Faces in 100 days, which featured celebrity portraits.

What I observed from the day

I tried not to beat myself up about it, or obsess about what my failure to meet my expectations might mean, but I think that this drawing might end up in the growing pile of unfinished artworks. This observation brings me to today’s topic, which is, what to do with your unfinished artwork. As I mentioned in a previous post, I have several unfinished or unsatisfactory art projects residing in my art studios, such as pastels, drawings, watercolors and some oil paintings that did not turn out as I had envisioned. This makes me wonder, what should I do with this collection of art misfits? Earlier last week, I serendipitously found the article, “50 Ways to Use Your Unfinished Art,” by Carrie, on https://www.artiststrong.com/50-ways-to-use-your-unfinnished-art/.

What I have done in the past with unsatisfactory art

In the past, I have usually tried to resolve issues with unfinished artwork, sometimes starting over from scratch; i.e. creating a brand new drawing on a new substrate and re-surfacing the canvas by sanding it with heavy grit sandpaper so it can be re-gessoed. Other days, when I am more desperate or frustrated, I throw it in the trash, never to be seen again. Unless of course, my husband gets to it before I take out the trash. In which case, he fishes it out and says, ‘Why did you throw this away?” Or, some variation upon that theme usually ensues when he finds my rejected art. Ok, so now on to some information I would like to share with you about the article I read, “50 ways to Use Your Unfinished Art.” Here are a few highlights from the article.

  • Take a photo of the artwork and “”manipulate the photos” to re-design it. Adobe PhotoShop is a good photo editing program to try for this option, with editing tools such as cropping, filters, light and dark balance, and photo filters. The possibilities here are really endless!
  • “Abandoned art project, anyone?” (Source: 50 Ways to Use Your Unfinished Art”)
  • Cut the artwork into pieces to construct a college. For example, the artist and author, Ann Blockley, has an excellent book, which describes this technique called, Experimental Landscapes in Watercolor, and it’s available on Amazon.com.
  • Cut the artwork and create a background for another piece of art.
  • Select a completely different art medium to finish the art. For instance, make it a mixed media piece.Amazon.com or your local library will probably have lots of books on mixed media art from which you can gain inspiration and techniques.
  • Re-use it in a reconditioned item of furniture.
  • Create a tray from your art using epoxy.
  • Throw the painting away-if it makes you feel better.
  • Take a break from it for two weeks or a month, to get some objectivity about your work. After that, re-assess your incomplete work, but only complete the pieces that you feel led to work on, and let go of the ones you aren’t sure how to resolve.
  • Post a photo of your artwork in a community where artists give each other feedback, such as http://www.emptyeasel.com, and ask for help from others.
    Self-Portrait, unfinsihed, flat
    Self-Portrait, pastel on paper, 18 x 24 inches, 2014, Jodie Schmidt.


    German Shepherd, pastel, flat, final
    German Shepherd, pastel on paper, 18 x 24 inches, 2018, Jodie Schmidt.
    Lincoln, unfinished, flat
    Abraham Lincoln, oil on canvas, 9 x 12 inches, 2018, Jodie Schmidt.
    Apple Still Life with blue bottle, flat
    Apple Still Life, acrylic on canvas, 11 x 14 inches, 2017, Jodie Schmidt.

    Cows grazing, unfinsihed, flat
    Out to Pasture, oil on canvas, 11 x 14 inches, 2014, Jodie Schmidt.


Below are some links to websites that can help you get started with some of the techniques listed in this article, such as collage. Another website to visit for ideas on how to re-invent your art might include, youtube or Pinterest. YouTube is a great way to see techniques demonstrated, it’s almost as good as being in a class. Just be sure to look for art tutorials with narration so you can learn what techniques and materials the artists are using to make their work. It’s harder to figure that out with the speeded up variety called, time lapse. Thanks for stopping by! I hope this article is helpful to someone out there who is struggling to complete their art. I am definitely going to try out some of these techniques myself to try and complete some of my unfinished art, which is posted in this week’s blog! I’ll let you know how it turns out.

.

What Should Artists Do with Unsold Art?

Several few weeks ago, I read a blog post by Jason Horejs entitled, “What Should an Artist do with a Lifetime of Unsold Artwork?” The article focused on a question posed by a reader on Jason Horejs’s site, who had reached the age of ninety, and had produced a vast collection of artwork during their career as an artist and had never mastered the art of marketing, but nonetheless had showed their artwork in various shows and competitions throughout their lifetime. Despite this, the artist was left wondering what to do with the artwork that hadn’t sold, and felt that their shyness had played a part in keeping them from selling more artwork. Jason Horejs opened up the question for discussion on his blog post, by asking readers to respond to this reader’s question about how to dispose of excess, unsold artwork, whether the artist was living or not. The answers to this question varied from hosting a super art sale, donating the work to a charitable cause, or selling the artwork to auction houses and art galleries thereafter.

Although I hope to have many more years to live, I am considering this question myself, “What should I do with my unsold artwork?” This question has been taking an added significance since I am rapidly running out of space in my apartment to store my paintings and drawings, despite occasional sales, art commissions and donations over the years. I am new to the world of art entrepreneurship, and still have a long way to go in refining my marketing and sales techniques; however, I have been painting and drawing for several years. In fact, I have been drawing and painting since I was nine years old, when I took my first painting class, and I have been intentionally focused on selling and marketing my artwork for about a year. Over time my stash of unsold artwork has continued to accumulate.

In addition, after attempting to organize my artwork this past week, by wrapping them in wax paper and bubble wrap, I am getting an idea of how much work it will be to find places to put my artwork. Now that I have a clearer picture of how long this organization process will take, I’m also realizing that I do not want this task to consume all of my time. I also don’t want to start renting a storage space to store the art yet, although it may come to that at some point. Another problem is that I am less inclined to give my artwork away to friends/family because I am making the switch from creating art as a hobby to a small business, and I feel it’s unfair to offer my artwork for free to some and charge for it from others.

In the past, I have given my artwork to others as gifts, and some of it has been trashed as a last result when I could not think of a way to salvage the painting. Other times, I have recycled canvases by sanding them and re-applying gesso to start a new painting. Sometimes I can get a really great painting out of the recycled canvases. Occasionally, my artwork has been sold to collectors and fans of my artwork. I’m grateful for each and every sale. On the other hand, I’d like to consider what some of my options might be for dispensing with my artwork. Some ideas that come to mind are: 1.) listing places in my neighborhood and surrounding areas, where my artwork can be exhibited such as art galleries, retail stores, and coffee shops, signing up for more art contests,, decorating my home and switching out the artwork periodically, and storing my best work and researching additional strategies to sell them online or in books about art business.

Here’s what some other people had to say about the subject of disposing of excess, unsold artwork: Gallery owner of Xandu Art Gallery in Phoenix, Arizona: Jason Horejs states that: “It’s never too late” to learn how to market your artwork, on his blog www.reddotblog.com,  Artist: Lori McNee suggests: Evaluate the unsold painting to see if you can make it better, on her website www.finearttips.com, and Teaching Artist: Christine Martell offers: Use old artwork to make new work by collaging drawings and paintings or making sculpture out of it, on her website http://christinemartell.com/about-christine-martell/. What about you reader? Do you have any additional thoughts on this subject? I would love to hear your suggestions, as I work through this long-term project of organizing my art studio and my unsold artwork.

Sketchbook cover, edited.jpg.
I’m taking a break from my biographical sketch of Sting this week and working on some prompts from this sketchbook. I hope to get back to the portrait next week.
Sketchbook, sunflowers,edited 2
Pictured is a colored pencil sketch of a field of sunflowers.
Sketchbook, Emperor Dragonfly, edited 2
Here is another page from my sketchbook of an Emperor Dragonfly made with colored pencil.
Sketchbook, Redwood, edited
A colored pencil sketch of a redwood tree.