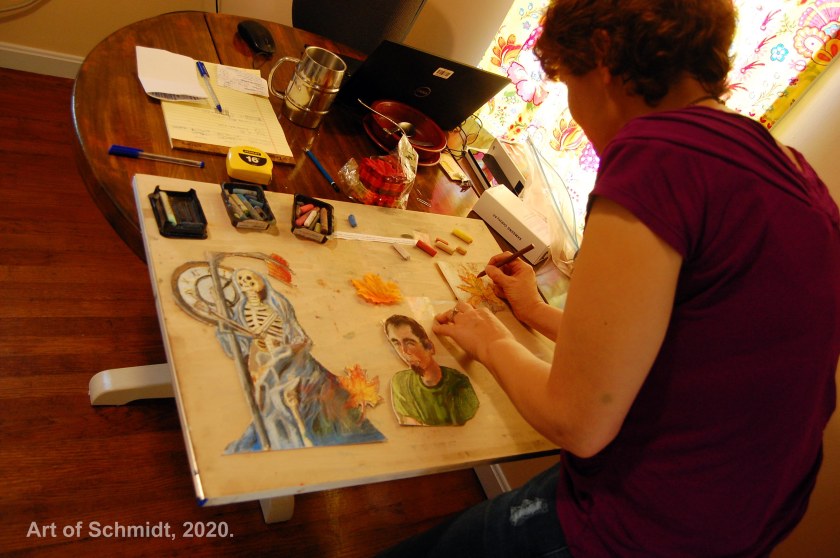
This week I am taking time to inventory my completed artworks for my series Constructed Realities. This mixed media series is a collection of poetry inspired works that incorporate both text and imagery with a variety of media such as soft pastel, oils, acrylics, and gouache. I am making these paintings as part of a portfolio in preparation for applying to graduate school in two years’ time. I’ve been stretched in ways I hadn’t thought possible working with a variety of media, and the challenge of translating abstract ideas into visual art. Here’s a snippet of my Statement of Purpose, which describes these works in more detail.
In my new works, I have incorporated mixed media and text, which is inspired by art journaling and mixed media art. For example, texts from selected poems or songs, such as the writings of Emily Dickinson, Maya Angelou, Robert Frost, and T.S. Elliot, Dylan Thomas, and Thomas Hardy are included in my paintings to give viewers clues about the content of my work. Other influences include the song lyrics of Sting, and other musicians, psychological theories of human development, and current events. These texts are incorporated into my paintings to help the view draw connections between the emotional content in my art and the written word.
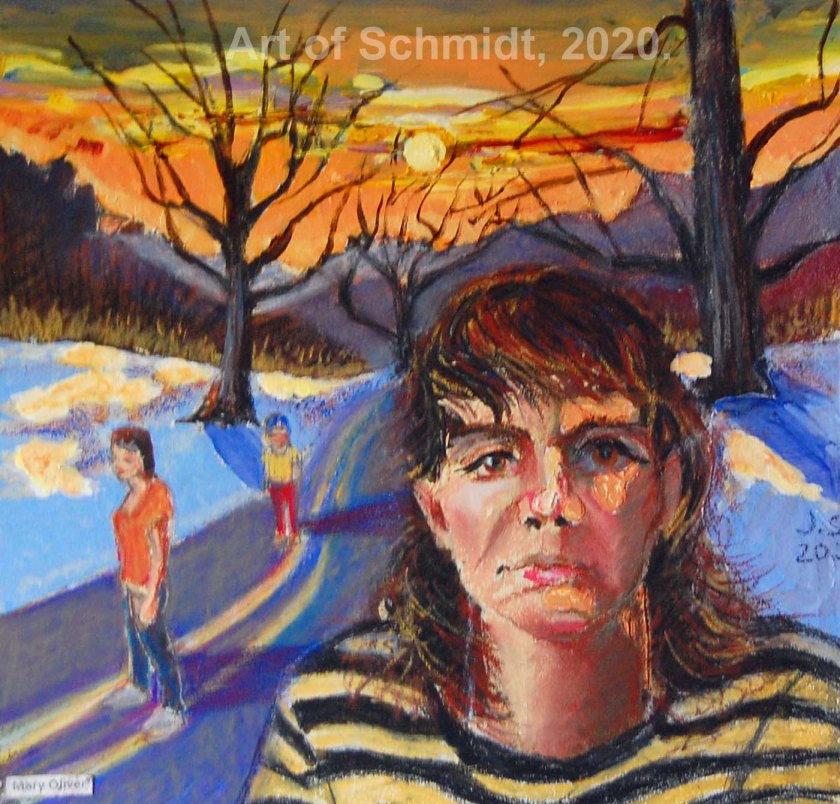
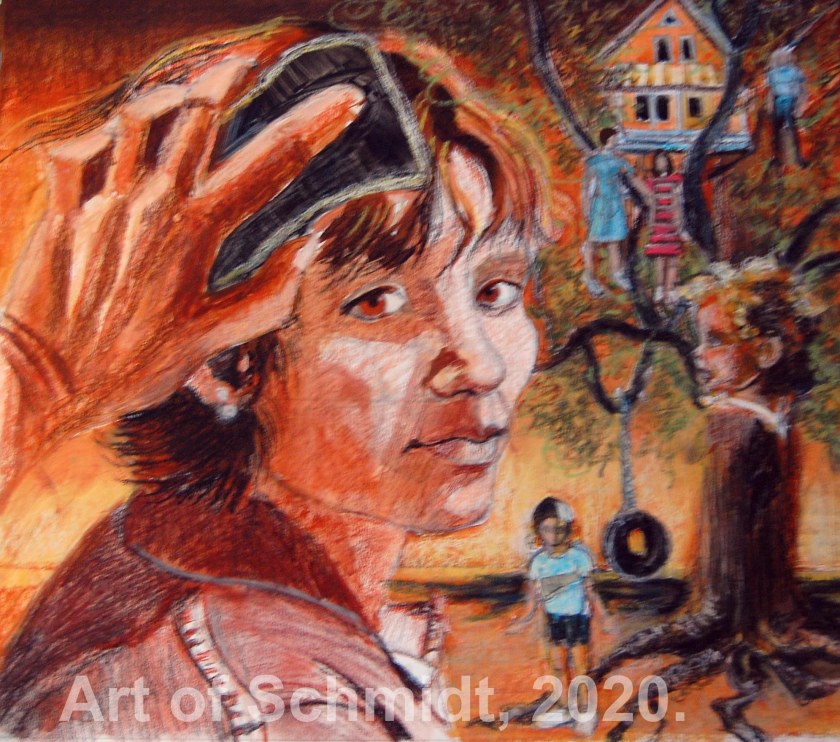
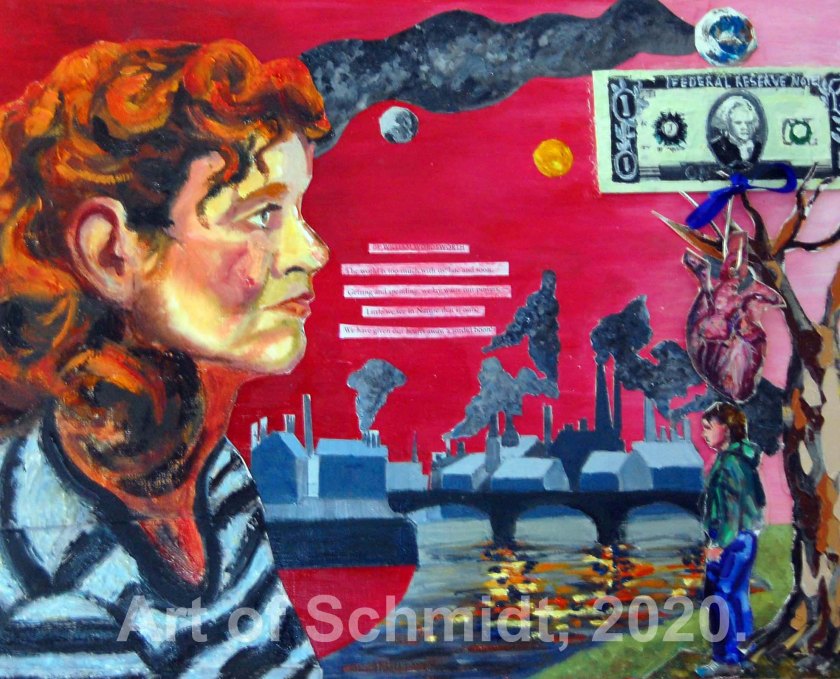
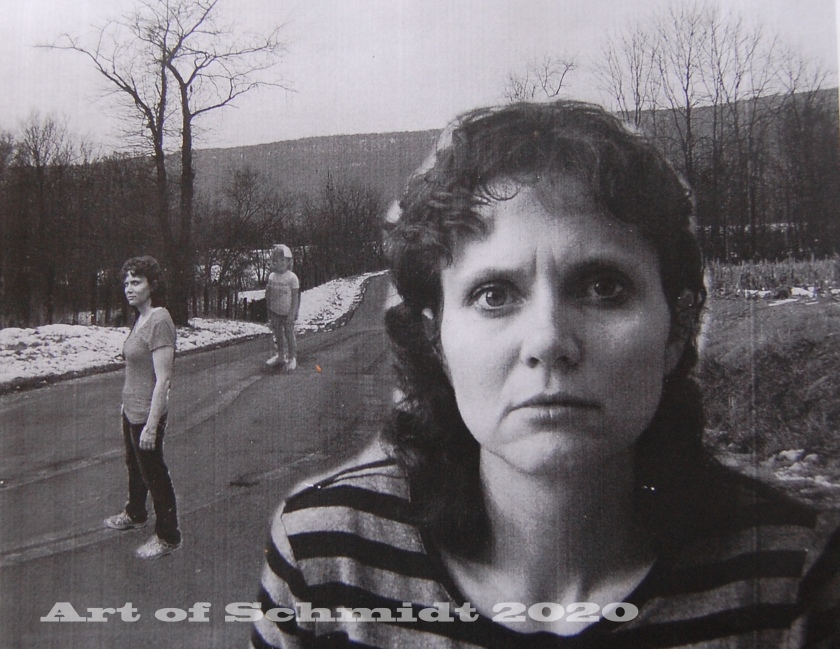
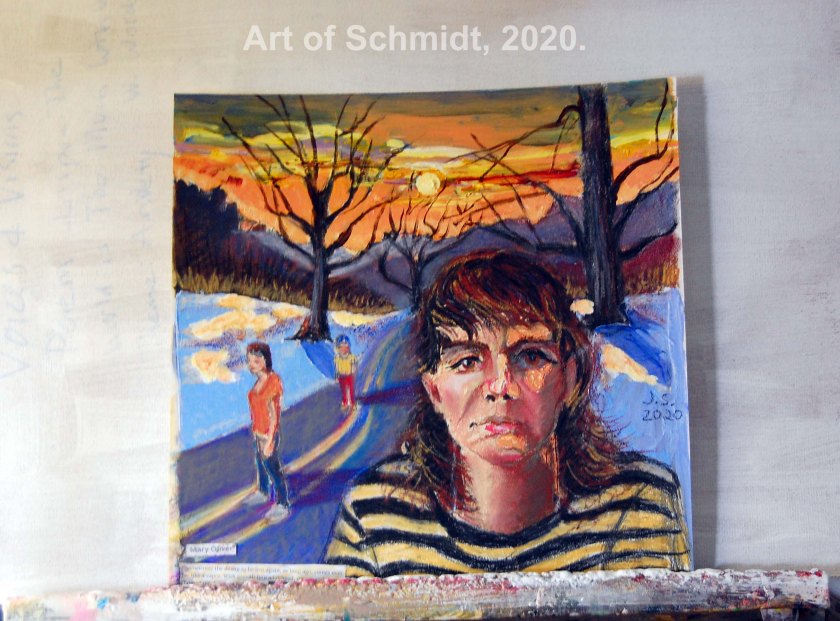
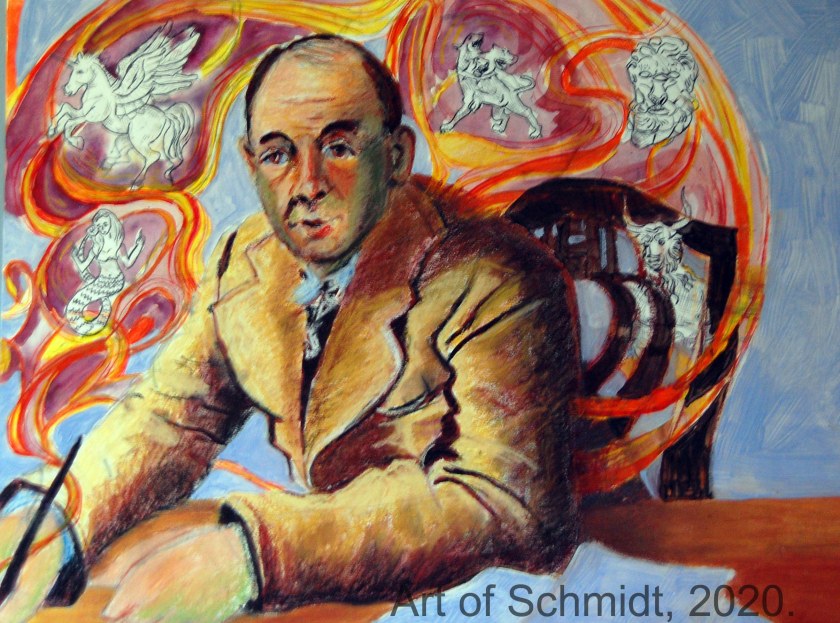
Jodie Schmidt, Time waits for no one, August 2020, mixed media: oil, acrylic, gouache, illustration board on masonite, 12 x 12 inches. Photo of Grim Reaper photo credit: Jbuzbee, 21 September 2008, Statue in the Cathedral of Trier, Germany, originally sourced on https://commons.wikimedia.org/wiki/File:CathedralOfTrier_Skeleton.JPG. The photo has been re-mixed into a fine art image with the addition of pastel, gouache and other pictorial elements have been added to the composition such as the clock and figures. The original photo source is liscensed under wikimedia commoms.Jodie Schmidt, Dream of Time Travel, July 2020, mixed media: oil, soft pastel and gouache on illustration board, 12 x 12 inches.Jodie Schmidt, Childhood Memory Loss, June 2020, mixed media: Soft pastel and gouache on illustration board, 16 x 20 inches.Jodie Schmidt, Money is the Bait, August 2020, Mixed media: oil, acrylic, paint chips, canvas paper, and illustration board on masonite, 16 x 20 inches.
Have you ever wondered why some artists, such as Andrew Wyeth, and others create their artwork in a series format? My first experience with creating artwork as a series was as an undergraduate at McDaniel College, taking art classes at the senior level. In this Senior Studio Capstone class, my fellow students and I were given the assignment to create a series of artworks that expressed a theme of interest or importance to us and to write an artist’s statement that described our artwork’s theme. For example, according to the website The Abundant Artist, some themes that artists might explore in a series include, 1.) “color and texture,” 2.) politics (Kathe Kollwitz), 3.) death, (Hirst) or 4.) messages that uplift, like Kelley Rae Roberts, Source: https://theabundantartist.com.
Prior to that, my assignments in drawing and painting consisted of drawing or painting to try and copy the still life or model in front of me, to teach the skills of observation. At that time, I had no idea how to even get started and had artist’s block for two weeks while I searched for artworks that inspired, all in vain. My Teacher did give us some guidance to the process though. He suggested that we create sketchbooks in which we pasted artworks of inspiration, no matter the medium, and he suggested that we look up art magazines, such as Art in America. Pouring over art magazines and artist websites, such as Forum Gallery, I could think of nothing new to say with my artwork that hadn’t already been said. I felt I had a lot of competition since there have already been many artists who have gone before me, who have created several unforgettable artworks to boot, such as Vermeer’s, Girl with a Pearl Earring, painted in 1665.
After weeks of struggle and seeking out artwork that inspired me, I had a solution. My answer came from an unlikely source, music. I decided to illustrate some of the songs of my favorite musician, Sting, using my self-portrait as a muse, along with color, and composition to portray various feelings of uncertainty, sadness, etc. Some of the songs I illustrated in my self-portrait series were Lithium Sunset and Secret Journey. The first song talks about how medication can help bring a person out of depression and make them strong enough to get back up again. While the second song, Secret Journey, talks about a mystical journey of enlightenment. I printed out the songs from Sting’s website, www.sting.com, pasted them in my sketchbooks, and underlined words and phrases that I thought were good candidates for illustration. And I referenced these songs and artworks of inspiration as I crafted my Artist’s Statement. As I searched through artwork that inspired, it became evident that I was drawn to the subject of the portrait, but I didn’t know how to make my work unique, because the portrait has been done numerous times before.
The imagery of Sting’s songs provided the perfect solution to my dilemma and I was off and running. My then-boyfriend, Dan, took photos of me to provide the source photos for my oil paintings. To make a long story short, I finished the series in time and even made a PowerPoint presentation as part of the project requirements of my finished works. In addition, I crafted an artist’s statement, which helped me to define the artwork by describing what the artwork would be about and what influences had to lead me to the finished work. I learned a lot about myself as an artist, such as how to distill ideas through writing artist statements and creating sketchbooks to illustrate my ideas by pasting artwork that inspired onto its pages. In particular, I discovered that I liked to make artworks that had a message, even if the search for the solution was far from easy. But back to my main question, “Why should artists work in a series?”
To investigate that question more fully, I did what many people would do, I googled it. The websites, Abundant Artist and Art Business.com, shed some light on the subject of content-based art. According to the authors, some of these benefits include: 1.) Making artwork in a series gives the artist a platform to connect with their audience on an emotional level because the artwork is focused and personal, 2.) Creating artwork in a series format helps others to understand what an artist’s work is about and who they are as a person, 3.) Artists who make artwork in a series are more likely to find art galleries to exhibit their work because they know how to market the artist and this format follow their business model, and 4.) Working in a series format helps artists to understand what topics/subjects are important to them, and which they like to draw or paint.
This week I am posting some photos of my latest painting, The Dream of Time Travel, which I started many months ago, and I am happy to say is finally complete! It is part of a series of paintings about the human condition, which is part of my portfolio for graduate school. These new works are a continuum of the series of paintings I completed as an undergraduate at McDaniel College, using the theme of the self-portrait, but expanding its representation to other themes such as poetry illustration. Thanks for stopping by!
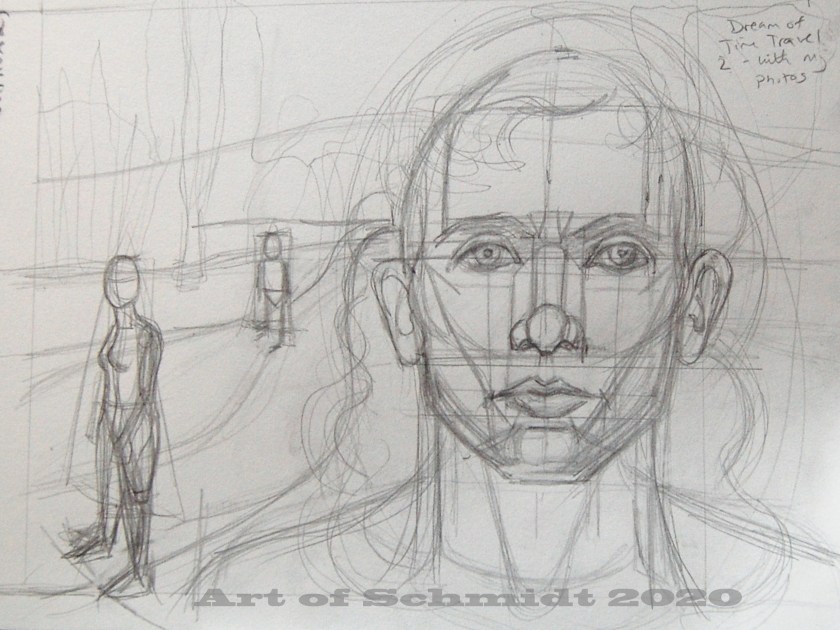
Stage 1: The Sketch.Stage 2: Photoshop Collage.Stage 3: Initial color lay in.
Mixed media Explained: Part 2, Types of Mixed Media
Hello friends, family, and fans,
This week I am continuing to elaborate on the theme of mixed media art, and I will be highlighting specific types of mixed media art, such as sculpture, assemblage, and torn paper collage. Last week I covered a broad definition of mixed media art, and I also explored the historical roots of this art form, through the artwork of Pablo Picasso and Georges Braque. They began making cubist collage works in 1912, with a variety of materials including canvas and rope. (Source: Eapen, Boaz. 15 Inspiring Mixed Media Art Portfolios that You Must See, retrieved from November 12, 2019, pixpa.com.)
The following is a list of some frequently used types of mixed media art:
Sculpture: A sculpture can be made with a variety of materials; therefore, it can be classified as mixed media art. Some materials which can be used to create sculpture include wood, glass, wire, metal, or readymade objects, etc. To begin, you can start by making a base for your sculpture and then, incorporate other media to the piece such as paint. (Source: ibid.) While writing this blog post, I found a fascinating sculptor through an internet search, who specializes in fantastical animals with a surreal twist, named, Ellen Jewett. To see her work, go to my modern met website at https://mymodernmet.com/surreal-animal-sculptures-ellen-jewett/.
Collage: A collage can be defined as a base, or a surface such as wood, paper, stone, or anything which is adhered to another material such as paper or fabric. (Source: ibid.) You can use a variety of materials in a collage such as newspaper cuttings, photographs, ink, paint, magazine cuttings, fabric, etc. The artist, Romare Bearden (1911-1988), specialized in creating collages based on the African American narrative, using imagery from magazines, such as Look, Life, and Ebony. (Source: Romare Bearden Biography, (1911-1918), retrieved from, https://www.biography.com/artist/romare-bearden
Assemblage: A close cousin to collage, assemblage has three-dimensional characteristics, which are composed in a new way to create a narrative. Readymade objects, such as children’s toys or items from the great outdoors, such as leaves or flowers can provide valuable fodder for this type of art. For instance, the artist, Joseph Cornell, (1903-1972) made assemblage boxes out of shadow boxes, photos, “Victorian bric-a-brac”, etc. He collected these items in junk shops throughout New York City and re-imagined these items to create artwork that expressed nostalgia. (Source: Wikipedia, Joseph Cornell, retrieved from https://en.wikipedia.org/wiki/Joseph_Cornell.)
With all of these options, it can be overwhelming to know where to begin your next project. As for myself, I like to look for supplies that are easy to find and relatively inexpensive. One good starting point for a mixed media project could be using paper as a surface or substrate. I have used Crescent cold press illustration board for my latest mixed media projects, which is a combination of cardboard and “100% cotton rag cold-press surface”. (Source: https://www.cheapjoes.com/crescent-no-310-illustration-boards.html#:) My self-portrait pieces were made with a combination of wet and dry media such as acrylic paint, gouache, oil paint, and soft pastels to add texture and interest. There are many other ways to use paper as well in different types of mixed media projects such as torn paper collage, and printmaking, but this is just the tip of the iceberg. The possibilities are endless!
For example, below is a list of ways in which you can use paper in a mixed media project:
Printmaking: There are many types of printmaking such as linoleum block prints, silk-screen prints, and Gelli-plate printing. To make prints, you will need a surface on which you place or carve an image and then transfer it to your paper through various means. For instance, in linoleum block printing you can transfer your image on the block to the paper by applying ink to your design, and then pressing the block onto your paper to make a print. The supplies you will need may vary depending on what type of printmaking you choose to work with. To learn more, you can go to https://www.metmuseum.org/about-the-met/curatorial-departments/drawings-and-prints/materials-and-techniques/printmaking. (Source: The Beginner’s Guide to Making Mixed Media Art, 20 September 2018, retrieved from format.com).
Torn paper collage: Use pages from old books, or many other sources such as newspapers, photographs, sheet music, notes, any paper you find around your house, construction paper, scrapbook paper, etc. From these ingredients, you can assemble a new image, called a college. (Sources: https://www.dentonisd.org/cms/lib/TX21000245/Centricity/Domain/6555/Torn%20Paper%20CollageWEB.pdf, and Format Team, The Beginner’s Guide to Making Mixed Media Art, 20 September 2018, retrieved from format.com).
The sky is the limit as far as what you can do here, although it’s a good idea to find out what the journal is made out of and what media it accepts, before attempting to paint in it. I recently obtained a Strathmore mixed media art journal from Amazon. It’s made of Bristol paper with a vellum finish. It’s designed to work well with dry media such as pencil, charcoal, and pastel. Or it can be used with pen and ink, marker, or college papers.
I’m hoping to use this journal to start some new projects from the Skillshare art classes I am taking online. Today, I tried my hand at the torn paper collage technique, and I used the tutorial by Jeanne Oliver provided in her book, The Painted Art Journal, which I highly recommend! My artwork was based on a family photo of my grandmother, Gladys Carter. Starting with a tracing of a sketch, I transferred the image to mixed media paper, using carbon paper and a pen. Then, I used a variety of different media here, with soft pastel, watercolor pencil, water, and torn papers affixed to the mixed media paper substrate. I’m hoping to post photos of this portrait project in next week’s blog post, I ran out of time today and had to go to work this afternoon. It’s a work in progress, and getting outside of my comfort zone to mix up all these different media types! That’s it for this week! Thanks for reading.
Have you ever gone to an art gallery and observed a work of art that was labeled mixed media, and wondered what it meant? I know I have, and I have wondered, how might I incorporate these mediums in my artwork? This question was the catalyst for starting my new art series, Constructed Realities, which combines a variety of mediums including, gouache, soft pastel, acrylic, pencil, and oil paint with a cold press illustration board as a substrate. In some ways, my art is a mixture of mixed media and traditional techniques; because I use realism for the style, but I also combine it with a variety of media, rather than working on one media, such as in oil painting, as has been the traditional practice for painting.
Today, I am focusing on describing mixed media art, in terms of a broad definition, and more specifically to explain what I mean when I label my own art, mixed media. And now, I’d like to offer a brief definition of mixed media art. Mixed media is a type of art that doesn’t limit people who have limited experience with art skills such as drawing. (Source: Eapen, Boaz. 15 Inspiring Mixed Media Art Portfolios that You Must See, retrieved from November 12, 2019, www.pixpa.com.) Instead, it is an art form that is accessible to anyone, even beginners. (Source: ibid) However, one caveat is that after you decide what type of mixed media art you want to focus on, you will need to develop some familiarity with specific processes and specific media, (Source: ibid), such as watercolor interact with other media.
Did you know that mixed media art has been around for about 100 years? I didn’t until I started researching this subject in more detail. Some historical examples of mixed media art include the artwork of the cubist artists, Pablo Picasso and Georges Braque, his cohort. About 1912, they began to incorporate collages into their artwork. (Source: ibid) In addition, “Surrealists, abstract expressionists, pop artists and brit artists” followed suit, and added mixed media to their repertoire of art-making. (Source: ibid)
In recent years, there has been an explosion of mixed media artwork on the internet on websites such as Youtube and Cloth Paper Scissors, (which also had a periodical format with artwork featuring a variety of artists), and in art technique books, by authors/artists such as, Pam Carriker, Mixed Media Portraits (2015) and Jean Oliver, The Painted Journal (2018). These artists have used a combination of wet and dry media, charcoal and paint, and or gesso, in their portraits. On youtube, you can find art journaling technique video demonstrations by artists such as Dina Wakely and one of my favorite artists and teachers, Julie Fan Fei Balzer. It’s a fun and free way to learn new art techniques from the comfort of your own home, which is really important these days, since so many colleges and art centers are closed, due to the pandemic.
I started out my mixed media art journey by working in a sketchbook to conquer my fears about mixed media, and it gave me the courage to explore mixed media in this new series. There is little to lose if you don’t like the artwork, and you can simply turn the page, rather than worry about ruining an expensive art canvas. Creating artwork with mixed media techniques is also helpful if you find yourself caught in the dreaded state of mind called the artist’s block, where you know you want to create something but feel stale in your chosen medium and want to learn something new and feel excited about making art again. My favorite website for looking up art tutorials is youtube. If you have a specific artist you are looking for, you can search for them, such as Pam Carriker, who has many instructional videos. And to learn more about art journals, visit: https://mymodernmet.com/art-journal-ideas/, to read the article, “How to Combine Drawing and Writing into Deeply Personal Art Journals”, by Sarah Barnes, October 11, 2017. Thanks for stopping by!
A Response to Last Month’s Post: How to Re-Prime Used Canvases
This blog post is inspired by a blog post from last month, entitled: Artists: What Should You Do withUnfinished Artwork? dated August 12, 2018. In this post, I wrote about the artwork that had been abandoned for various reasons. I also added a list of various highlights from an article entitled, “50 Ways to Use Your Unfinished Art.” Several suggestions for completing your artwork were listed in the aforementioned article including taking pictures of your artwork to manipulate it, cutting up the artwork and re-assembling it, throwing the painting away, etc. However, one technique that I didn’t mention for completing art work is to start over from scratch. For example, this could mean re-surfacing an old canvas by using sandpaper or even a power sander, depending on how thick the paint has been applied to the canvas. The processes for re-finishing canvases are different, depending on whether acrylic or oil paint was used, which is a fact that I learned after reading two articles on The Painters Keys website- Re-priming OldCanvases, and How to Resurface an Old Painting by Ericka Lancaster. I really wish I had known this sooner, as I am not sure how my old paintings, which have been re-surfaced with sandpaper and acrylic gesso, will hold out over time.
Consequently, I plan to do more research in the future, before I am embarking on a similar project with older canvases. I want to be certain that I can create quality paintings which will pass the test of time. Ok, so now to what I learned from reading these articles. For example, in the Painter’s Key’s website, the author responded to a query from a reader about how to restore an old canvas, so that it could be re-painted. (Source: http://thepainterskeys.com/reprime, Robert Genn, date of access 08/24/18). In response, the author stated that to re-surface an old oil painting can create some concrete and creative challenges because if the re-surfacing process is not done correctly, it can cause the paint to flake off from the surface. (Source: ibid) Therefore, because of this possibility, many artists choose instead to use new materials, i.e. new canvases or substrates. (Source: ibid)
Here are some tips for re-purposing oil paintings from the article, Re-priming Used Canvases:
Sand the surface of your oil painting until it is completely dull in appearance. (Source: Ibid)
I used a power sander with 150-grade coarse sandpaper, because it is easier to use than individual strips of sandpaper, and it gets the job done much faster.
After you sand the painting, use a microfiber cloth to get rid of any excess paint chips. For heavily encrusted paint, you can give the canvas or paper another pass with the power sander.
When the canvas is completely clean and you can see the tooth of it, use an “oil or alkyd-based gesso or oil primer.” (Source: ibid) You can use a scumbled technique and a rag, to cover the offending areas you don’t like about your painting, and leave other areas, untouched that you like. Using this technique is a compromise between using the old surface and the paint which remains, and painting a new layer of paint. (Source: ibid)
As an alternative, you can use a mixture of titanium white oil paint and linseed oil. You may add additional colors to the mixture if you would like to add an underpainting; such as burnt sienna or yellow ochre. (Source: ibid) This step will provide you with a middle value, with which to compare your other values and help to create color harmony in your painting.
On the other hand, re-priming or painting over acrylic paintings is a completely different scenario and process. For instance, “acrylic molecules remain sticky forever,” and you need to ensure that there is “no final varnish remaining.” Instead, acrylic paintings should be “cleaned outdoors with household ammonia and well flushed with water before applying a water-based gesso, thick or thin.” And unlike oil based surfaces, paintings with an acrylic paint can be re-surfaced with gesso as a priming agent. (Source: ibid)
Here are some steps you can follow to re-surface an old acrylic painting, according to the artist, Erica Lancaster:
Clean the old acrylic painting with a soft microfiber cloth until it is free of dust or grime.
Use sandpaper to remove the old acrylic paint with a light touch, while you concentrate on “heavily textured” sections of the canvas. If you can’t get rid of all the texture from the acrylic paint, don’t worry about it.
Go over your sanded acrylic painting with a clean cloth to remove any additional paint particles.
Paint your canvas with Gesso and use even coats. Remember to let each coat dry at a time before applying a new layer of gesso. This can take up to 24 hours to “cure.” If you want to thin out your gesso, you can add water to the mixture. Test your canvas and check to see that it is completely dry, before applying any acrylic paint. As a general rule, you want to have at least two dry coats of gesso on your painting before you begin adding acrylic paint.
Go over your canvas with sandpaper again. As to how many times you choose to sand the canvas that is completely up to you. Deciding on what amount of texture to give your paintings is a personal creative choice, and it depends on what type of “look” you want your painting to have, such as photorealism or abstraction. If you want a realistic look, you would want less texture and thin smooth layers of paint.
So there you have it. Two different approaches to re-surfacing old paintings, depending on whether you have an acrylic or oil painting on your canvas. This week’s artwork
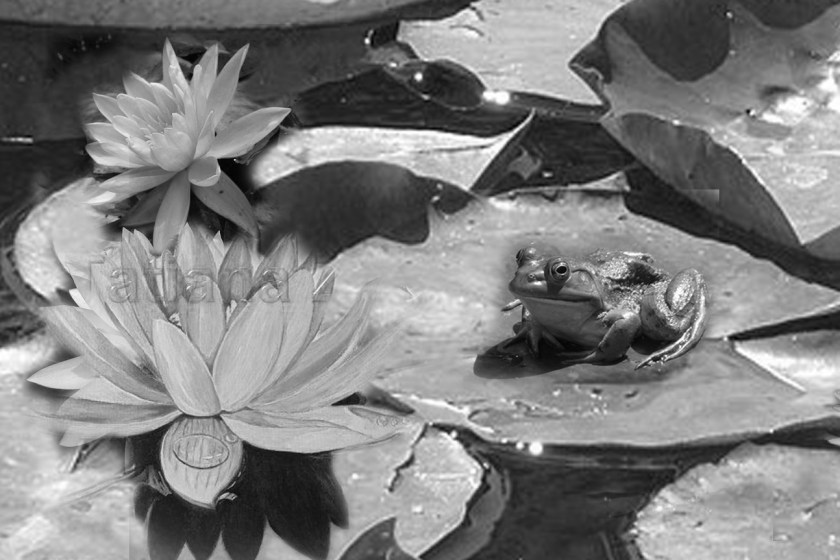
Three Value Sketch, water lily, graphite on paper, 5 x 7 inches, Jodie Schmidt, 2018.Adobe Photoshop Photo Collage, digital image, Adobe Photoshop Elements, 5 x 7 inches, Jodie Schmidt, 2018.Color Study for Water Lily, Mixed media, 6 x 7 inches, Jodie Schmidt, 2018.
features the creative process of my latest painting in progress, a water lily. My next step is to combine all these sources I created to make a completed oil painting, which I hope to finish in the near future! Happy painting and thanks for stopping by!
It was a tough day in the art studio today. I woke up this morning with very little energy; however, I was determined to make time for art regardless of my lethargic state. Several cups of coffee and a long walk around my neighborhood later, I was ready to begin. I set out to start a cat portrait I have wanted to work on for a while from one of my art technique books. I set my timer for 25 minutes and I started drawing from an art demonstration book. Suffice it to say, the drawing did not go well, at all, despite several attempts to get the proportions of the cat’s body correct. Each attempt just brought on more feelings of frustration. After the third attempt, I finally gave up and put my supplies away and went to do something else, probably laundry or reading a book. After working on the cat portrait, I realized that I am really out of practice when it comes to doing animal portraits, as I have been focusing a lot more on floral subjects, which is made up of simpler shapes and less precise in their proportions than animals and people. And I realized that I needed to practice drawing much more often like I did last summer when I completed a drawing challenge, 100 Faces in 100 days, which featured celebrity portraits.
What I observed from the day
I tried not to beat myself up about it, or obsess about what my failure to meet my expectations might mean, but I think that this drawing might end up in the growing pile of unfinished artworks. This observation brings me to today’s topic, which is, what to do with your unfinished artwork. As I mentioned in a previous post, I have several unfinished or unsatisfactory art projects residing in my art studios, such as pastels, drawings, watercolors and some oil paintings that did not turn out as I had envisioned. This makes me wonder, what should I do with this collection of art misfits? Earlier last week, I serendipitously found the article, “50 Ways to Use Your Unfinished Art,” by Carrie, on https://www.artiststrong.com/50-ways-to-use-your-unfinnished-art/.
What I have done in the past with unsatisfactory art
In the past, I have usually tried to resolve issues with unfinished artwork, sometimes starting over from scratch; i.e. creating a brand new drawing on a new substrate and re-surfacing the canvas by sanding it with heavy grit sandpaper so it can be re-gessoed. Other days, when I am more desperate or frustrated, I throw it in the trash, never to be seen again. Unless of course, my husband gets to it before I take out the trash. In which case, he fishes it out and says, ‘Why did you throw this away?” Or, some variation upon that theme usually ensues when he finds my rejected art. Ok, so now on to some information I would like to share with you about the article I read, “50 ways to Use Your Unfinished Art.” Here are a few highlights from the article.
Take a photo of the artwork and “”manipulate the photos” to re-design it. Adobe PhotoShop is a good photo editing program to try for this option, with editing tools such as cropping, filters, light and dark balance, and photo filters. The possibilities here are really endless!
“Abandoned art project, anyone?” (Source: 50 Ways to Use Your Unfinished Art”)
Cut the artwork into pieces to construct a college. For example, the artist and author, Ann Blockley, has an excellent book, which describes this technique called, Experimental Landscapes inWatercolor, and it’s available on Amazon.com.
Cut the artwork and create a background for another piece of art.
Select a completely different art medium to finish the art. For instance, make it a mixed media piece.Amazon.com or your local library will probably have lots of books on mixed media art from which you can gain inspiration and techniques.
Re-use it in a reconditioned item of furniture.
Create a tray from your art using epoxy.
Throw the painting away-if it makes you feel better.
Take a break from it for two weeks or a month, to get some objectivity about your work. After that, re-assess your incomplete work, but only complete the pieces that you feel led to work on, and let go of the ones you aren’t sure how to resolve.
Post a photo of your artwork in a community where artists give each other feedback, such as http://www.emptyeasel.com, and ask for help from others.
Self-Portrait, pastel on paper, 18 x 24 inches, 2014, Jodie Schmidt.
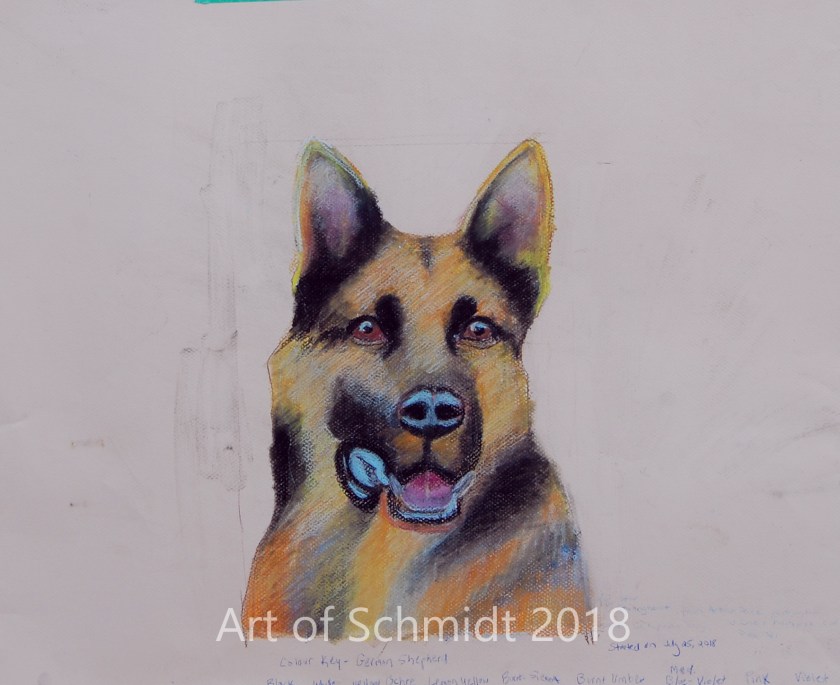
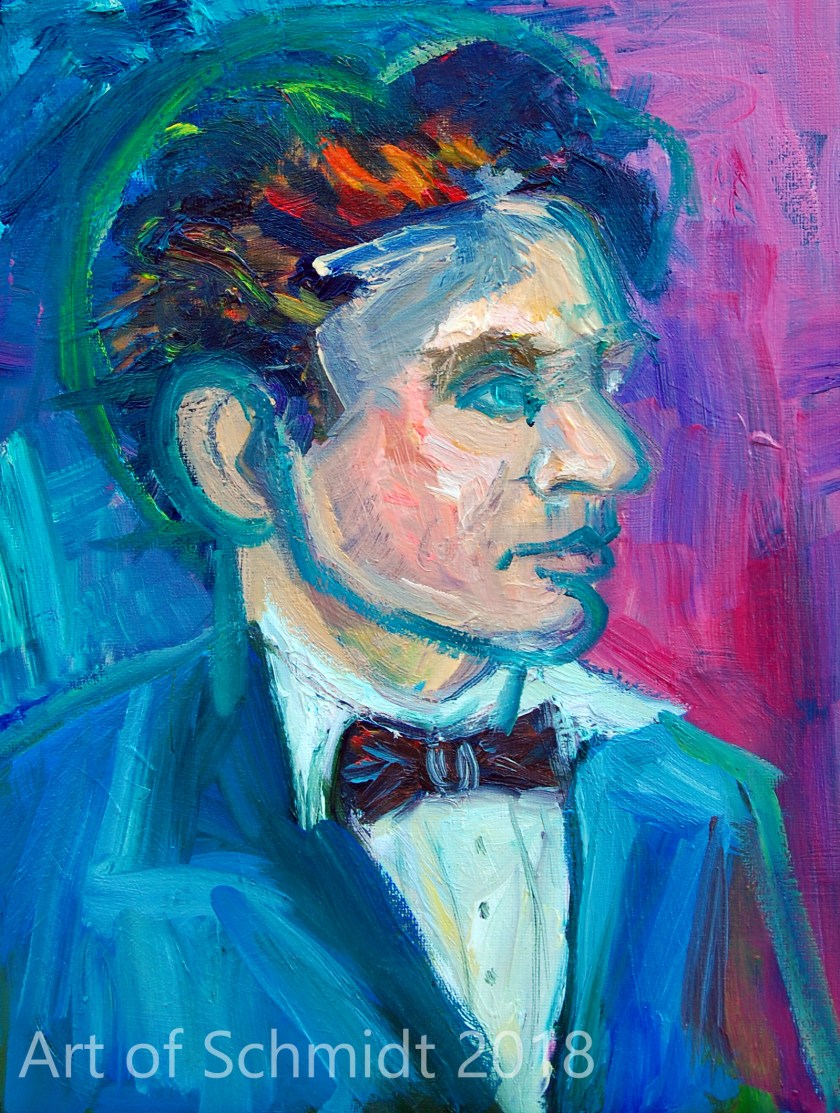
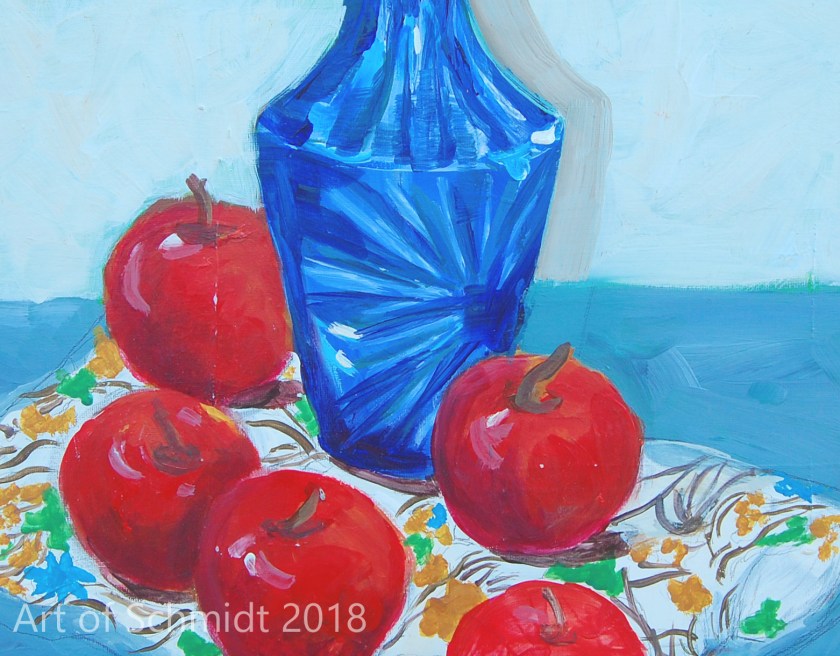
German Shepherd, pastel on paper, 18 x 24 inches, 2018, Jodie Schmidt.Abraham Lincoln, oil on canvas, 9 x 12 inches, 2018, Jodie Schmidt.Apple Still Life, acrylic on canvas, 11 x 14 inches, 2017, Jodie Schmidt.
Out to Pasture, oil on canvas, 11 x 14 inches, 2014, Jodie Schmidt.
Below are some links to websites that can help you get started with some of the techniques listed in this article, such as collage. Another website to visit for ideas on how to re-invent your art might include, youtube or Pinterest. YouTube is a great way to see techniques demonstrated, it’s almost as good as being in a class. Just be sure to look for art tutorials with narration so you can learn what techniques and materials the artists are using to make their work. It’s harder to figure that out with the speeded up variety called, time lapse. Thanks for stopping by! I hope this article is helpful to someone out there who is struggling to complete their art. I am definitely going to try out some of these techniques myself to try and complete some of my unfinished art, which is posted in this week’s blog! I’ll let you know how it turns out.
As I mentioned in last week’s post, I have been struggling with artist’s block this summer. During this journey, I’ve tried various things to break out of it, such as: copying art demonstrations from art technique books, re-touching/re-working old paintings, and working in a prompt driven sketchbook. Unfortunately, the later project hasn’t been working out so great lately. I’ve been procrastinating on doing the daily prompts, and have felt uncertain as to which mediums to work in for the sketchbook pages, should it be watercolor, colored pencil, acrylic, gouache or something else that I use? I have been unhappy with the colored pencils because they take so long to build up color and tone and I want to get some momentum and finish the nature section so I can keep moving along. It’s also difficult to correct mistakes with this medium, and I am finding that a lot of my prompts are not living up to my expectations. All of which keeps me stuck in neutral, and not making new work consistently.
Some insights I have gained about my artist’s block
Maybe it’s also the heat of the summer, which seems extraordinarily hot, even for Maryland. Or perhaps it’s the dislocation I feel in adjusting to a new house, guilt (genuine or otherwise, about abandoning household chores to make time for art), or something else entirely. Whatever the cause, I want to come up with some solutions so I can move forward and make more art, and hopefully at least some of the pieces will turn out the way I envision or will be at least good enough to post on social media. This year there’s been a mix of both good paintings and some not so good paintings. The paintings I’m not happy with might get thrown out, or sanded and re-worked, depending on the state of the canvases. I feel dry and uninspired, and I feel I have reached the limit of my skill set in art. In fact, I feel I need more fuel for my creativity and knowledge base.
Tips for breaking through a creative block
While I am pondering these thoughts, I’d like to share some tips I picked up from an article, “How to Survive a Creative Slump,” by Our Daily Craft, on http://www.ourdailycraft.com/2017/02/21/survive-creative-slump, by Sarah White, February 21, 2017. A few suggestions that the author offers include: 1.) starting with a small creative project, 2.) working quickly, 3.) reading a book you enjoy, and 4.) organizing or cleaning something in your home. For instance, the author suggested a few small projects to help jumpstart your creativity such as 1.) “sewing a cloth napkin,” 2.) “knitting a headband,” 3.) Paint on a 4 x 4-inch surface, or “writing a haiku.” (Source: ibid) Since I am not particularly good at crafts or anything DIY, which I learned after re-finishing some furniture and all of my kitchen cabinets in my new home, I have settled on painting a 4 x 4-inch canvas of Canada Geese. I re-worked this miniature canvas in oil paints about a week ago, and I am fairly happy with the result. Another suggestion that the author makes is to re-visit old projects that you had left unfinished. (Source: ibid) I certainly have a pile of unfinished works-such as unfinished drawings, pastels, and pages in my sketchbook where things just didn’t come together. Perhaps it would be a good problem-solving exercise to utilize my creativity.
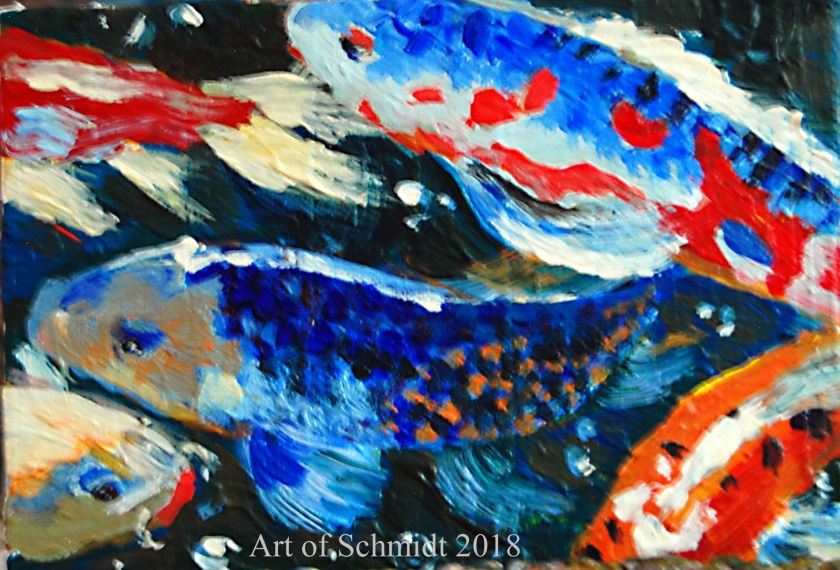
In addition, the author also discussed making something quickly-which I’m not sure I would do
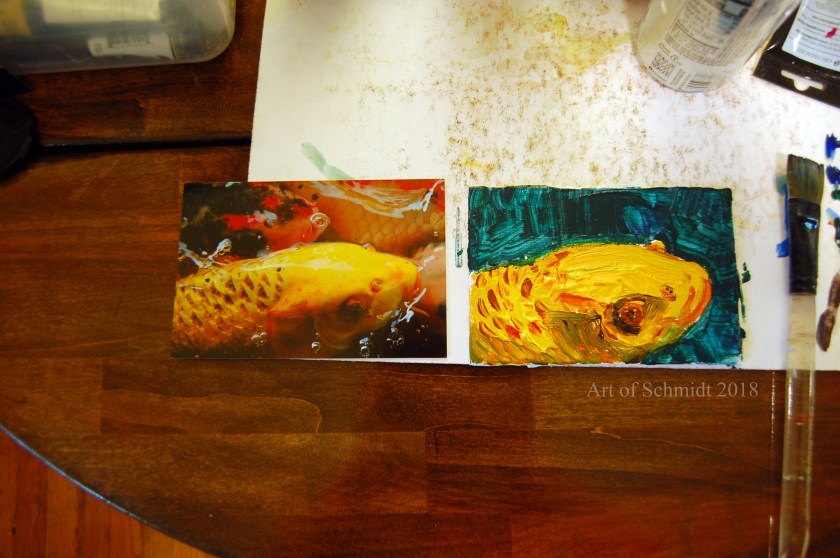
This quote was obtained from the internet via a Google search, and no copyright infringement is intended.Canada Geese Trio, oil on canvas, 4 x 4 inches, 2018, Jodie Schmidt.Koi Fish Group, acrylic on canvas, 5 x 7 inches, 2018, Jodie Schmidt. This is the first stage of this painting.Koi Fish Group, acrylic on canvas, 5 x 7 inches, 2018, Jodie Schmidt. And this is the completed acrylic painting! Koi Fish portrait, acrylic, 4 x 6 inches, 2018, Jodie Schmidt. Pictured is stage 1 of this acrylic painting.Here are some small value paintings of water lilies and a blank canvas. I’m not sure what the subject might be for this one yet.Close up of the water lily paintings in progress.Pictured is stage 1 of my dandelion sketches in colored pencil and pastel. I wasn’t happy with how these turned out, so I re-worked them in two subsequent stages, pictured here. These drawings are from my Julia Orkin-Lewis Sketchbook, Draw Every Day, Draw Every Way. My first step to re-work these paintings was to cover up the areas I didn’t like with gesso and let it dry so I could re-paint with acrylic. I learned that colored pencil is really hard to get rid of if you make a mistake.And my final two steps were to add another layer of gesso after the first layer had dried. Afterward, I re-painted the offending areas with Liquitex acrylic paint. However, I’m still not sure if I am happy with these sketches, but I don’t want to get stuck on them either. They are, after all, supposed to serve as ideas for completed future paintings.
since most of the problems I have had with my art have been poor planning. Another problem which leads to unsatisfactory art for me is not spending enough time checking the accuracy of the drawing, as unfortunately happened with my latest portrait of Lincoln, which I decided to re-work and re-draw with oil paints. Needless to say, it didn’t turn out that well. Maybe if I were an abstract painter I could get away with a more intuitive approach to painting, than a more structured one with specific steps, but I am not. Since I am a more traditional painter, I am sticking with what works for me, which is starting with a drawing, adding three values in pencil to the sketch, and then making a colored sketch to base the final painting upon. Unfortunately, the more I tried to fix the drawing, the worse it got. In the end, I finally decided to abandon it, and start with a new sketch on a totally different substrate on a larger scale. It hasn’t become a painting yet, but I think I identified some drawing errors in the painting, by making a new sketch.
However, one thing I do want to try is to read a novel, article, or poem, to try and get some new ideas flowing. Some of my best works have been inspired by the poetry of Dickinson and Frost. Maybe reading literature will also help me to become a better writer and get me out o this writer’s block I seem to be assailed with lately. How about you? Do you have any suggestions for breaking out of a creative rut? I’d love to hear! Just post in the comments section of this blog. Thanks for stopping by!
I am taking a break from blogging on my Art of Schmidt site until life calms down a little. I’ve been juggling an art show deadline that’s looming and the art hasn’t been coming
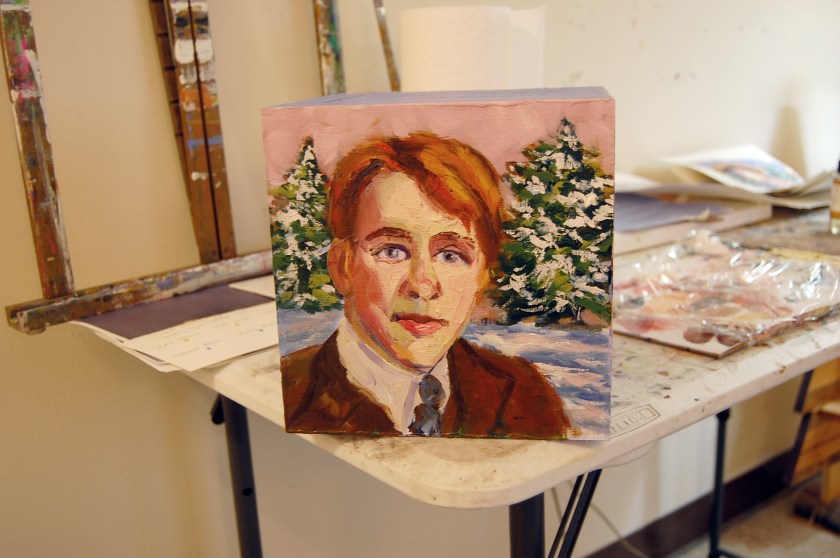
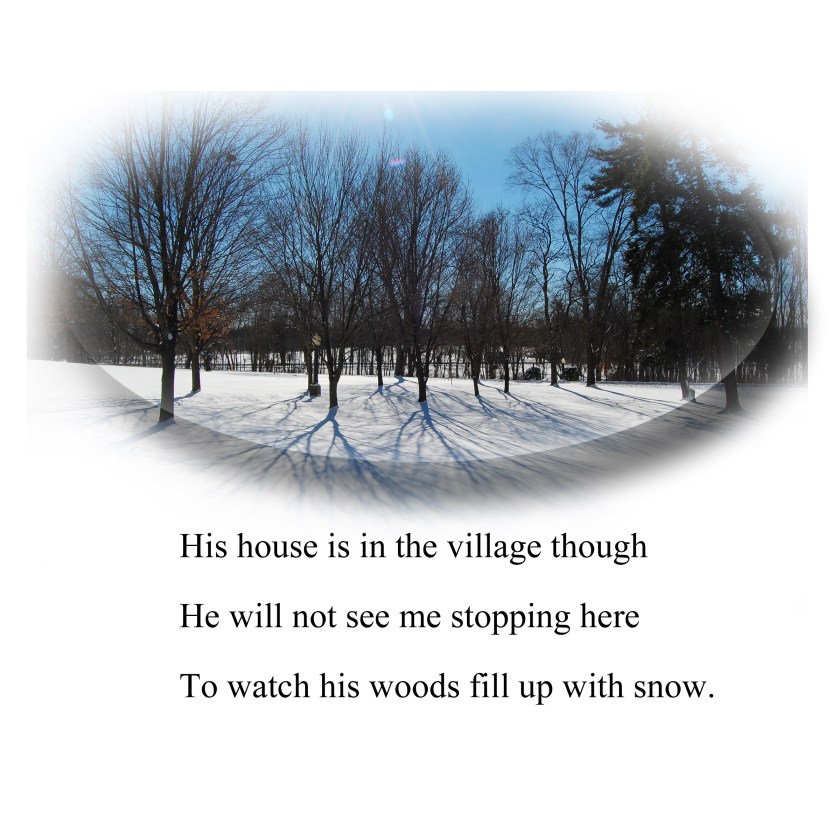
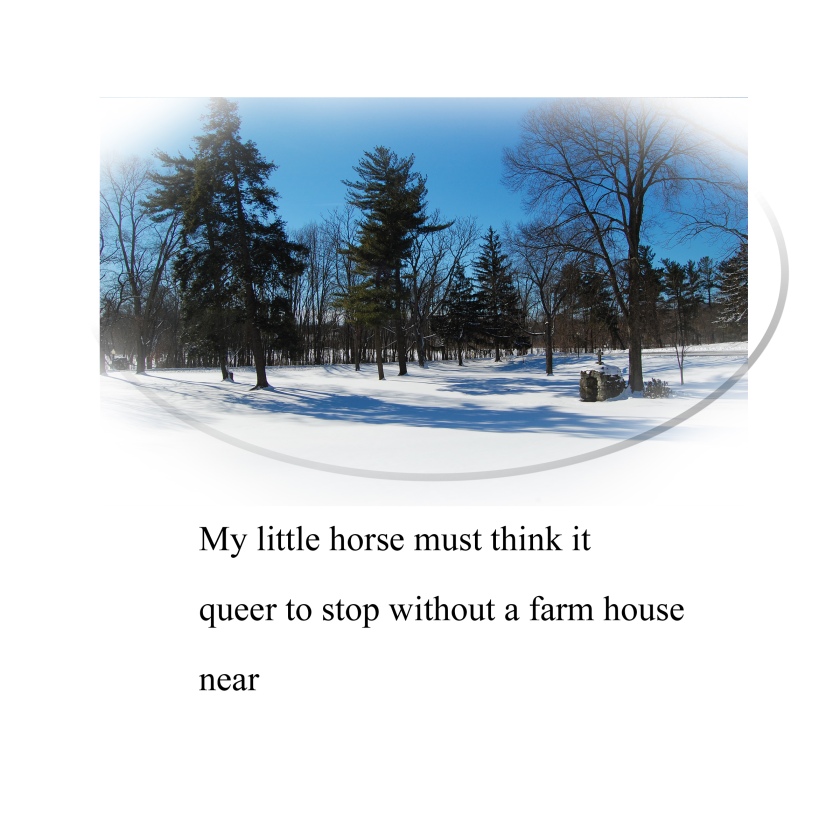
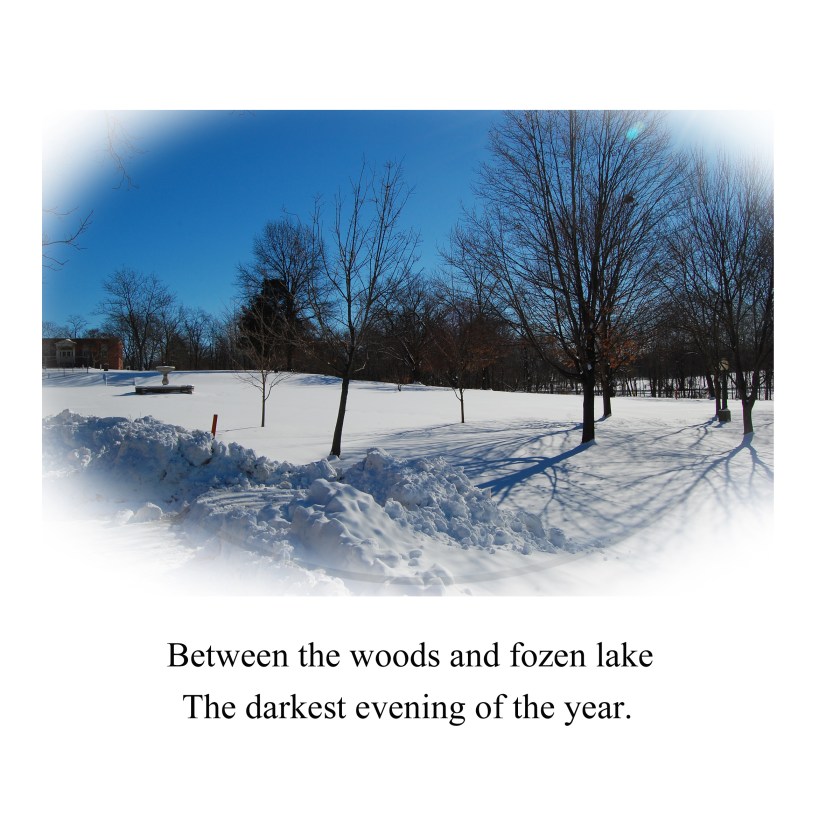
Stopping by the Woods, Mixed Media, 2018, Jodie Schmidt.
together, and some health issues. I hope to get back to blogging more frequently after the art show opening, On and Off the Wall at the Artists Gallery in Frederick, MD. I will be joined by many local artists who work in a variety of media. All art will be for sale via silent auction and proceeds will help raise funds for the continuation of the gallery, which is operated exclusively by artists. For now, here are some progress photos of my box entry, Stopping by the Woods. Here is a link to the art show if you want to know more about it:http://www.theartistsgalleryfrederick.com/march-2018-box-show.
In my next post, I hope to show you the completed project, but for now, I am still figuring out how to bring it to a successful conclusion. I was not happy with how the sides of the box turned out, so I am re-doing them from scratch in Photoshop. Next week, I hope to transfer these images to the box and paint the panels in Acrylic. Here are the Photoshop files in progress that will be displayed on the other sides of the box. The box is based on the poem, Stopping by the Woods on a Snowy Evening, by Robert Frost. I love this poem because it is so mysterious. Is he talking about death, life, or the push and pull between responsibilities and dreaming, when he stops to admire the snowy woods, but then decides that he has other things to get back to at the end of the poem when he says he has “miles to go before I sleep”. I think the poem can be open to many interpretations and that’s what makes it interesting. Thanks for stopping by!
Hello Friends, I apologize for my lack of blog posts lately. This past year I had several art shows such as the Frederick Coffee Company in Frederick, MD, as well as my Studio Sale at my home. These events were great opportunities to share my art with others and connect with faces both new and well known. However, I really got behind on some of the administrative aspects of my art business such as cataloging, adding new items to my commerce shops, and keeping up with my profit and loss sheet. I also created lots of new portraits in my 100 Faces in 100 days challenge which took up a lot of time. This past month, I also had some new tasks to take on while my mom has been recovering from shoulder replacement surgery.
So now I am trying to catch up on these neglected tasks. as a result, my posts might be less frequent and you may see some blog posts from my archives. I hope to be more caught up in these administrative tasks by next January so I can post more often. Today I am featuring a blog post which showcases my latest email newsletter for Art of Schmidt. This issue has a short segment about my latest painting series, Voices,
This slideshow requires JavaScript.
and Visions, in which I illustrate poetry, quotes and song lyrics in mixed media and acrylic. Thank you for stopping by! If you would like to subscribe to my email newsletter for Art of Schmidt, just send an email request to jsjschmidt2@gmail.com.
Have you ever heard the saying, that writers should write about what they know? I am taking that axiom and applying it to the artwork that I create. This week’s offering features two acrylic mini-canvases of two scenes from a nearby park called Catoctin State Park in Thurmont, MD, just minutes away from my apartment. I have lived in the Thurmont/Sabillasville area in Maryland for about 10 years and have visited the Catoctin State Park many times with my husband, family, and friends.
About 4 years ago, I spent a day photographing different views of this park on a cool, Autumn day when Maryland had a genuine colorful, fall. It’s taken me four years to turn my photos into paintings, but better late than never right? In these works, I sought to capture the quiet beauty and colorful foliage of the park. As always, my work
These are two completed acrylic paintings on miniature canvases.


 , who has many instructional videos. And to learn more about art journals, visit:


